
How to Convert 720p to 1080p with AI (Improve Video Quality)
 Sara Smith
720p footage is still everywhere — Zoom exports, DVR recordings, early YouTube uploads, webcam captures, and phone clips from a few years back. When you drop those files into a 1080p editing timeline or upload them to a platform that favors Full HD, the mismatch shows up fast: letterboxing, soft text, or a visible quality gap next to native 1080p clips.
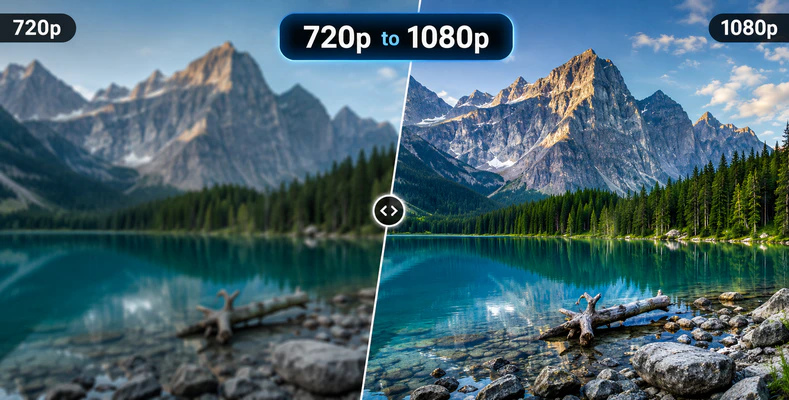
Converting 720p to 1080p is a smaller jump than going to 4K — only 1.5× in each dimension, or 2.25× total pixels — which makes it one of the most practical ways to increase video resolution. Start with the AI workflow below if you already have a file ready; the sections that follow explain when conversion is worth it, how tools differ, and how to export without undoing the quality gain.
Related: 1080p to 4K upscaling · 4K to 8K upscaling · Free HD video converter online
How to Convert 720p to 1080p with AI: Step-by-Step Guide
Converting 720p to 1080p with AI usually takes four steps — import, set output settings, preview, and export. For a short test clip, you can try an online HD converter for a quick conversion without installing any software. However, most online tools impose file-size limits. For blocky Zoom exports, noisy DVR footage, or videos longer than 10 minutes, a desktop AI upscaler with local processing, denoise, and content-specific AI models is usually the better choice.
Step 1 Choose an AI upscaler
Most 720p upscalers only stretch pixels to 1920 × 1080. Based on our testing, AVCLabs Video Enhancer AI works differently: it analyzes multiple frames to recover details lost to compression, processes everything locally on your GPU (with no upload limits for hour-long conference recordings), and offers dedicated AI models for faces, animation, and noisy footage instead of relying on a single generic filter. We use AVCLabs for this tutorial. If you prefer another desktop AI upscaler, the overall workflow is usually very similar.
Why AVCLabs for 720p → 1080p
- One-click presets — Upscale to HD resolution, Upscale to 4K, and more
- Six AI Enhancement models for manual control when presets need tweaking
- Multi-frame analysis recovers compression damage a plain resize cannot
- Local GPU processing — no upload limits on long conference or DVR archives
- Denoise, deinterlace, and batch queue in one desktop workflow
Step 2 Import your 720p video
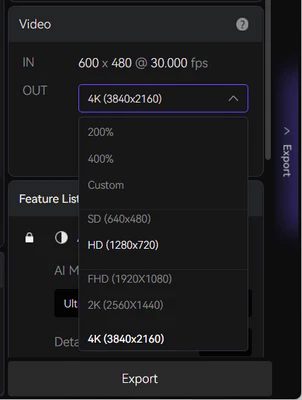
Launch the app and click Import Video, or drag your file into the workspace. Confirm the info panel reads 1280 × 720 — some files labeled "720p" were already upscaled from a lower resolution.
Step 3 Set the output to 1080p — or start with a preset
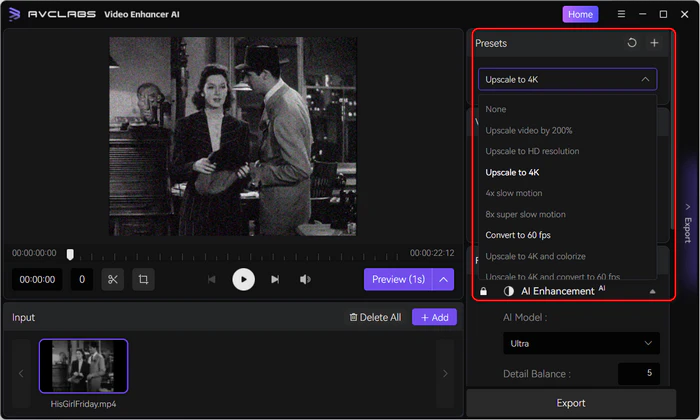
Under Output, select 1920 × 1080 (Full HD). AVCLabs also provides several built-in presets. For a one-click workflow, you can choose the Upscale to HD Resolution preset (or Upscale to 4K if you want to export directly to 3840 × 2160). If the preset delivers the result you want, simply preview the video to check the quality, then skip to Step 6 to export. Otherwise, continue with Steps 4–5 to select an AI enhancement model and fine-tune the processing.
Step 4 Select an AI Enhancement model
Six models are available under AI Enhancement — Standard, Ultra, Anime, Standard (Multi-Frame), Ultra (Multi-Frame), and Denoise. Match your source below; when unsure, try Standard (Multi-Frame) or Denoise on a short test clip.
| 720p Source | Recommended Model | Notes |
|---|---|---|
| Zoom / Teams recording | Standard (Multi-Frame) or Denoise | Switch to Denoise if macroblocking is severe |
| Webcam or old phone video (face-heavy) | Standard (Multi-Frame) | Keeps skin texture consistent across frames |
| DVR / security footage | Denoise | Deinterlace 720i sources if comb lines are visible |
| Animation or screen capture | Anime | — |
| Clean general B-roll | Ultra or Ultra (Multi-Frame) | Multi-Frame helps clips with camera motion |
Step 5 Adjust Video Settings (optional)
Open Video Settings to tweak brightness, saturation, contrast, and sharpen — most compressed 720p clips need little change here. Leave Noise at zero unless you want added film grain; it adds noise rather than removing it. For compression artifacts, use the Denoise model in Step 4.
Step 6 Preview, export, and verify
Preview the results; once satisfied, click Export. Match your export bitrate to the delivery target (see recommended export bitrates). After export, confirm the file reports 1920 × 1080 in your media inspector and spot-check against the original on a Full HD display.
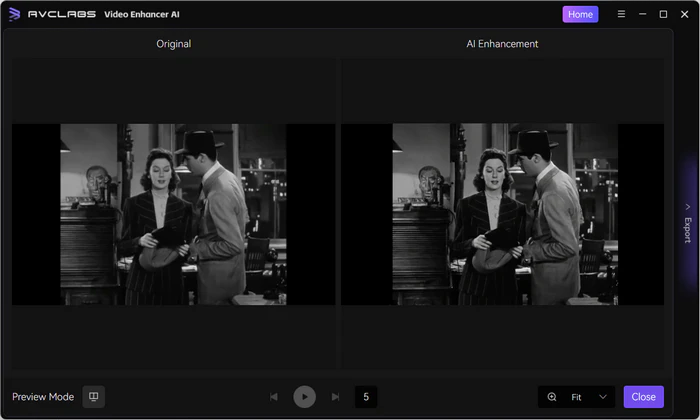
Note that: Results vary by source quality — a heavily compressed or out-of-focus recording will not match native 1080p camera footage. In practice, most users underestimate how much noise hides in old 720p recordings: a clip can look acceptable in a small preview window and still fall apart once it sits next to native 1080p footage on a Full HD timeline.
When Should You Convert 720p to 1080p?
Not every 720p clip earns a Full HD pass — but many do. If you already ran the AI workflow above and the result still looks soft next to native 1080p footage, or if you have not started yet and want to know whether upscaling is worth the effort, these are the situations where it usually pays off:
- Mixed-resolution edits: A 1080p project includes 720p B-roll, screen recordings, or stock clips that look soft or sit in a smaller frame.
- Conference and webinar archives: Zoom, Teams, and Google Meet typically record at 720p — fine for playback, awkward for marketing or training repurposing.
- Platform or client specs: Some upload guidelines and brand standards list 1080p as the minimum delivery resolution.
- Legacy phone and webcam libraries: Footage from pre-2018 phones or built-in laptop cameras is often 1280 × 720 with heavy compression.
- Stepping stone to 4K: Cleaning noisy 720p at Full HD first can produce a better final 4K result than jumping straight from 720p — though many AI tools can export to 4K in one pass if you prefer speed over fine control.
If your audience only watches on mobile and the source is already sharp, 720p may be enough. Convert when Full HD is required or when the quality gap is visible on the screens your viewers use.
720p vs 1080p: What's the Difference?
Here is the underlying resolution gap in numbers — and why a timeline stretch behaves differently from an AI pass on compressed 720p:
| Format | Resolution | Pixels per Frame | Common Sources |
|---|---|---|---|
| 720p HD | 1280 × 720 | 0.92 MP | Zoom, webcams, DVR, older phones |
| 1080p Full HD | 1920 × 1080 | 2.07 MP | Modern phones, DSLRs, broadcast |
720p is 1280 × 720 (about 0.92 MP per frame); 1080p is 1920 × 1080 (about 2.07 MP) — 2.25× more pixels, or a 1.5× scale in each dimension. That is a smaller jump than 1080p to 4K, which is why AI handles it efficiently.
A plain resize — dragging a 720p clip onto a 1080p timeline and exporting — fills the frame but does not add information. Bilinear or bicubic interpolation averages existing pixels, which softens edges and leaves compression blocks from low-bitrate sources untouched. That is why two 720p files upscaled the same way can look very different: a clean DSLR downscale holds up; a blocky Zoom recording does not.
AI upscaling targets that gap specifically. At the 1.5× scale factor, an AI 720p upscaler can reconstruct edges, reduce macroblocking, and sharpen fine detail — a meaningful step if you need to make 720p video clearer for Full HD delivery. You still cannot recover detail that was never recorded, but on typical compressed 720p the improvement over a timeline stretch is often obvious around text, faces, and UI elements.
Planning further up? See our 1080p to 4K guide once you have a clean Full HD master.
Best 720p to 1080p Converters Compared
Picking the best 720p to 1080p converter depends on more than output resolution — AI enhancement, offline processing, and whether the tool fits your source type all matter. A browser upload form, a timeline scale command, and a desktop AI upscaler can all export 1920 × 1080, but they produce very different results on compressed Zoom or DVR footage. Here is how four common options stack up:
| Tool | AI Enhancement | Offline | Free | Quality | Best For |
|---|---|---|---|---|---|
| AVCLabs Video Enhancer AI | Yes | Yes | Free trial | ★★★★★ | Compressed or noisy 720p — Zoom, DVR, old phone video |
| Online HD Converter | Limited | No | Yes | ★★ | Quick previews on clips under a few minutes |
| Premiere Pro / DaVinci Resolve / Final Cut | No | Yes | No | ★★★ | Editing workflow — clean B-roll that already fills a 1080p timeline |
FFmpeg (scale=1920:1080) | No | Yes | Yes | ★★ | Developers — automated pipelines and batch resolution changes |
The star ratings reflect 720p → 1080p output quality, not general editing utility. Resolve is a superb NLE but scores ★★★ here because timeline scaling does not recover compression damage. Online tools cap uploads and offer fewer model controls — fine for a sanity check, not for confidential or hour-long archives. FFmpeg belongs in a render farm; it is the wrong call when a blocky Zoom recording needs denoise before anyone watches it at Full HD size.
Blocky Zoom, webcam, or DVR footage → follow the step-by-step AI workflow above. A short clip you want to preview first → try the online HD converter. Clean B-roll already on a 1080p timeline → NLE scaling may be enough. After you pick a tool, match your export bitrate to the delivery target and skim the source-specific tips if anything looks off.
Recommended Export Settings for 720p to 1080p
Once you have picked a tool and run the upscale, bitrate is what keeps — or loses — the improvement. Under-encoding a noisy 720p source wastes the AI pass; over-encoding adds file size without visible gain on most platforms:
| Output Use | Suggested Bitrate (1080p H.264) | Notes |
|---|---|---|
| YouTube / social upload | 8–12 Mbps | Platform recompresses; avoid going below 8 Mbps on noisy sources |
| Client review | 15–25 Mbps or ProRes | Preserves detail for feedback rounds |
| Editing intermediate | 20 Mbps+ or mezzanine codec | Use before a separate color grade or 4K pass |
| Replacing video in an NLE | Match project settings | Re-encode audio at 192–320 kbps AAC if replacing the video track |
Upscale Tips by Source: Zoom, Webcam, DVR & Phone
If you already matched your source to a model in the walkthrough above, these notes cover edge cases that still come up often with each footage type:
Zoom and Teams recordings
Shared-slide layouts compress aggressively — preview segments where small text appears, not just the talking-head portions. Virtual backgrounds can produce edge halos after upscaling; if that happens, dial back enhancement strength rather than adding sharpening.
Webcam and laptop camera
Office lighting often produces soft, noisy 720p where moderate denoise helps more than maximum detail recovery. A talking-head insert in a 1080p project may look fine at native 720p centered in frame — upscaling to fill is not always the better choice.
DVR and security footage
Deinterlace before upscaling or comb lines multiply. Upscaling improves timestamp and license plate readability but cannot overcome wide-angle lens softness — set expectations accordingly.
Older smartphone video
Confirm the actual frame rate before export; pre-2018 phones often used variable fps. Outdoor footage upscales well; indoor low-light clips benefit from denoise over aggressive sharpening.
Common 720p to 1080p Conversion Mistakes to Avoid
- Stretching on the timeline without enhancement: Filling a 1080p frame with a 720p clip works for metadata but not for blocky web sources.
- Sharpening instead of upscaling: Unsharp masks add halos without adding pixels. Use AI or accept the softness.
- Chaining 720p → 1080p → 4K with re-compression at each step: Export one high-quality intermediate, or go straight to 4K in a single AI pass.
- Upscaled-already sources: Some "720p" files started at 480p or 540p. Check dimensions in a media inspector before processing.
- Ignoring audio when replacing tracks: A crisp 1080p video with thin, re-compressed audio draws the wrong kind of attention.
FAQ About 720p to 1080p Conversion
How can I improve 720p video quality?
Work from the original file, not a re-uploaded social copy. To make 720p video clearer at Full HD size, run an AI pass with denoise — sharpening filters alone add halos without adding pixels. Upscale once, export at a sensible bitrate, and preview faces and text before batching a long library.
What is the best 720p to 1080p converter?
It depends on the source. Compressed Zoom or DVR footage needs desktop AI with model control — AVCLabs Video Enhancer AI handles that workflow with local processing and batch support. For a two-minute test clip, the online HD converter is enough to preview results before installing anything.
Can I upscale 720p to 1080p for free?
Yes. Free tools can resize 720p to 1080p, but AI enhancement features are usually limited. The online HD converter and FFmpeg both scale at no cost — fine for a quick dimension change on clean footage. For denoise and model control on compressed sources, desktop AI upscalers like AVCLabs offer a free trial; see the converter comparison for how free options differ.
Can I convert 720p to 1080p without losing quality?
You will not invent detail the camera never captured, but you can avoid making things worse. Start from the least-compressed file available, upscale once, and export at a sensible bitrate. AI denoise on compressed 720p often looks cleaner than a plain resize even if it is not true native 1080p.
Can I skip 1080p and upscale 720p directly to 4K?
Yes — most AI tools support it. A two-step path (720p → 1080p → 4K) gives finer denoise control on very noisy sources; a single pass to 4K is faster and fine for most projects. See our 1080p to 4K guide for the next stage.
Will the file size increase?
Yes. More pixels need more data — expect roughly 2–3× the file size at equivalent quality settings. Tune bitrate to your platform's limits.
Is 720p still acceptable in 2026?
For mobile-only delivery, often yes. For TV, projectors, client presentations, or platforms that list 1080p as preferred, converting is worth the effort.
How long does AI conversion take?
The 1.5× scale is lighter than a 4K upscale. A 10-minute 720p clip typically renders in 10–30 minutes on a modern GPU, depending on denoise settings and model choice.
Conclusion
Most editors hit 720p to 1080p not because the format is outdated, but because sources arrive mixed — a 1080p timeline with a few 720p Zoom clips, or a client spec that lists Full HD as the minimum. The right approach depends on where the file came from and how much quality the delivery actually needs.
Run compressed footage through AI with the right model and a sensible export bitrate. Use lighter tools when the source is already clean or you just need a quick preview. Skip the step entirely when mobile-only delivery will never show the extra pixels. That keeps the workflow proportional to the problem — not every 720p file needs the heaviest tool in the comparison table.