
How to Upscale 1080p to 4K: Enhance Video Quality with AI
 Sara Smith
Yes — 1080p to 4K upscaling can look genuinely sharper, not just larger. The catch is how you get there. Changing the export to 3840×2160 or fitting a Full HD clip into a 4K timeline updates the metadata, but it does not add detail. Without enhancement, edges stay soft and the picture still reads as stretched 1080p on a big screen.
AI upscaling closes that gap by predicting fine detail a plain resize cannot recover. It will not turn a blurry source into native 4K camera footage, but on clean Full HD material the difference is often easy to see. How you upscale matters too — desktop AI, an online tool, and NLE scaling trade quality, speed, and control differently. This guide compares those three methods, with source prep and export settings to preserve detail through delivery.
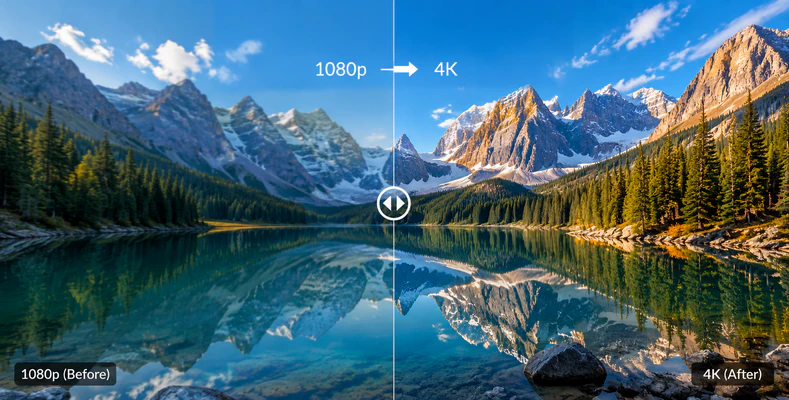
What Does 1080p to 4K Upscaling Mean?
In practical terms, you are outputting each frame at four times the pixel count of Full HD. That jump matters on big screens: individual pixels become less visible, small text stays readable, and you gain room to crop without the image falling apart.
| Resolution | Pixels |
|---|---|
| 1080p (Full HD) | 1920 × 1080 |
| 4K UHD | 3840 × 2160 |
Exporting at 4K dimensions is easy — a timeline resize or export preset tells the software to fill a larger canvas. Making it look good is the hard part, because that process does not create new detail on its own. Drop a 1080p clip on a 4K sequence and export, and the result often looks slightly mushy around hair, grass, and small type. Standard scaling interpolates between existing pixels; it smooths the image rather than sharpening it.
AI upscaling works differently. An AI model trained on vast sets of matched low- and high-resolution footage has learned how hair, fabric, brick, and small type typically resolve at 4K. It uses those patterns to predict missing detail — not invent random texture — where a 1080p frame has no pixels left to show. A regular 1080p to 4K converter changes the output resolution; an AI 1080p to 4K upscaler tries to improve what you actually see. The output is not magic — a blurry original will not become indistinguishable from a native 4K shoot — but on a clean Full HD source, the difference against a plain resize is often obvious side by side.
If you are working from 720p or lower, start with our 720p to 1080p guide. For a quick browser preview at Ultra HD, try our free online 4K video upscaler.
Best Ways to Upscale 1080p to 4K
In most cases, upscaling 1080p to 4K comes down to one of three methods — each suited to a different scenario, whether you need maximum quality, a quick test without installing software, or a fast resize inside your editor. Compare them in the table below, then follow the walkthrough for the approach that fits your project.
| Method | Quality | Best For |
|---|---|---|
| AI video upscaler (Method 1) | High | Professional enhancement, archival remastering, long-form video |
| Online 1080p to 4K converter (Method 2) | Medium | Short clips, quick tests, no software install |
| Video editor scaling (Method 3) | Basic | Quick timeline fit when source is already sharp |
Method 1: Upscale 1080p to 4K with AI Video Enhancer
For 1080p to 4K, desktop AI is usually the strongest quality path — especially when you need batch processing, a preview before a long render, or a one-click preset that targets Ultra HD. AVCLabs Video Enhancer AI includes an Upscale to 4K preset and handles the full pipeline from Full HD import through 3840×2160 export.
Key Features of AVCLabs Video Enhancer AI
- Upscale 720p, 1080p, or 4K footage up to 8K resolution
- AI models rebuild texture, edges, and fine detail lost to compression
- Denoise, deinterlace, and stabilize in a single workflow
- Batch processing for long clips and multi-file projects
Step 1 Import your 1080p video
Launch AVCLabs Video Enhancer AI and import your file — drag and drop or click Import Video. Check the info panel reads 1920 × 1080; some files tagged "1080p" were already upscaled from 720p or lower, which limits how much detail a 4K pass can add.
Step 2 Apply the Upscale to 4K preset
Under Preset, select the Upscale to 4K built-in preset for a one-click workflow. It automatically sets the output resolution to 3840 × 2160 without requiring manual resolution adjustments.
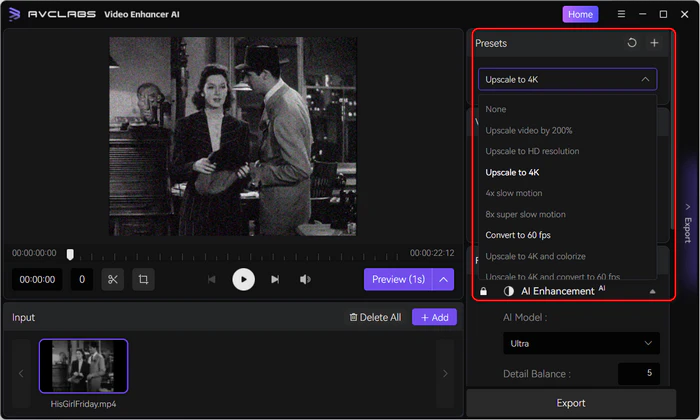
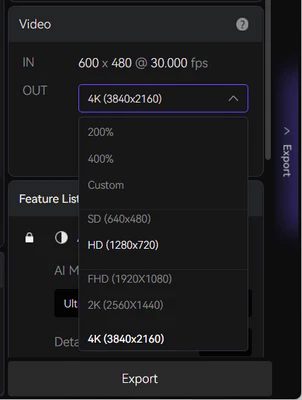
Alternatively, you can manually select 4K from the Output menu and then choose the appropriate AI enhancement model. For noisy or heavily compressed footage, select the Denoise model to help reduce artifacts and improve clarity.
Step 3 Preview, then export
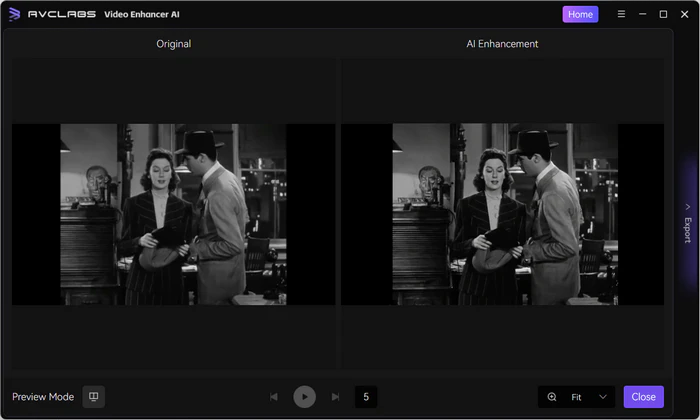
Scrub to a clip with faces, titles, or fine texture — the areas where a 2× upscale most often shows halos or blockiness — and click Preview (1–10 seconds is enough). If the preview looks soft or crunchy, try Denoise or re-check that the source is true Full HD. When satisfied, click Export.
Step 4 Check the 4K master
Confirm the exported file reports 3840 × 2160 in your media inspector. Play it back at full size on a 4K monitor or TV if you can — upscaled hair, grass, and small type should read sharper than a plain timeline resize, even though the result will not match native 4K camera footage from the same scene.
Method 2: Online 1080p to 4K Converter
Browser-based tools like our free online 4K video upscaler are handy for a fast sanity check — upload a clip, see roughly how an AI pass might look, download, and move on. No install, no account in many cases, and you can run a test from any machine.
That convenience comes with trade-offs. Upload limits usually cap you at a few minutes or a few hundred megabytes, which rules out most interview footage or event recordings. Your file also leaves your machine and sits on someone else's server, so think twice before uploading unreleased client work or internal meetings. Processing queues can slow down at peak times, and you typically get fewer model choices and export controls than desktop software offers.
For a 30-second social clip or a one-off experiment, online conversion is fine. For anything you intend to ship — a client master, a stock submission, a full-length remaster — local desktop processing is the safer and more capable route. Method 1 above covers that workflow in detail.
Method 3: NLE Built-in 1080p to 4K Scaling
Premiere Pro, DaVinci Resolve, and Final Cut Pro can output 1080p to 4K without a separate upscaler — useful when your timeline is already Ultra HD, you need a quick 3840 × 2160 master, or the source is clean enough that a straight resize holds up. This is frame fitting, not enhancement: the NLE scales each clip to fill a 4K canvas using its built-in interpolation.
Step 1 Create a 4K sequence
Set sequence or project resolution to 3840 × 2160 (4K UHD). Import your 1080p file and place it on the timeline.
Step 2 Scale the clip to frame
In Premiere Pro, right-click the clip and choose Set to Frame Size. In DaVinci Resolve, adjust Zoom under Transform until the image fills the frame — under Project Settings → Image Scaling, Sharpen Edges can add a slight crispness, but it will not recover detail a plain resize cannot reach. In Final Cut Pro, set Spatial Conform to Fill. Avoid leaving the clip at 100% scale on a 4K timeline unless you want letterboxing.
Step 3 Review on a large display
Scrub through sections with faces, small text, and fast motion. NLE scalers interpolate between existing pixels, so the export meets 4K dimensions but may still look soft next to an AI-enhanced file. If quality falls short, run the source through Method 1 first, then edit the upscaled master in your NLE.
Step 4 Export at 4K
Render at 3840 × 2160 with codec and bitrate matched to your delivery target (see the export settings table below). Confirm the finished file reports correct dimensions in your media inspector.
Resist compensating for softness with heavy sharpening or unsharp masks — halos around edges and crunchy type usually look worse than the original blur. Reserve NLE scaling for speed, metadata compliance, and projects where the source is already sharp; reach for AI when viewers will scrutinize detail on a large screen.
Before You Upscale 1080p to 4K: Source Checklist
Whichever method you choose, a few minutes of prep often saves hours of re-rendering. A weak or heavily compressed source limits what any upscaler can recover:
- Start from the highest-quality source: Camera original, not a re-uploaded social copy or screen recording.
- Check actual dimensions: Confirm the file is true 1920 × 1080 — some "1080p" exports are upscaled already.
- Deinterlace legacy footage: Interlaced 1080i sports or broadcast clips need deinterlacing before upscaling or comb artifacts multiply.
- Trim dead sections: Remove unusable segments before batch processing long assets.
- Evaluate noise level: Heavy grain or compression blocks may need a denoise pass — enable it in your AI tool rather than stacking aggressive sharpening later.
- Plan for lower sources: If your clip is 720p, consider a 720p to 1080p pass first, or export directly to 4K if your software supports large scale factors.
Recommended Export Settings for 1080p to 4K Output
After AI enhancement finishes, export settings determine whether the extra detail survives delivery. Match codec and bitrate to where the file is headed:
| Delivery Target | Resolution | Suggested Codec / Bitrate |
|---|---|---|
| YouTube 4K | 3840 × 2160 | H.264 35–45 Mbps or H.265 20–30 Mbps |
| Client review (high quality) | 3840 × 2160 | ProRes or DNxHR mezzanine |
| Social re-upload | 3840 × 2160 | H.265 15–20 Mbps (platform will recompress) |
| Archival master | 3840 × 2160 | Lossless or near-lossless intermediate |
Tips for Better 1080p to 4K Upscaling Results
- Match frame rate: Keep 24p, 30p, or 60p consistent through the chain.
- Consider HDR separately: Upscaling resolution does not automatically add HDR metadata.
Treat AI upscaling as the final quality pass, not a fix for badly exposed or out-of-focus footage.
When Should You Upscale 1080p to 4K?
Not every Full HD clip needs a 4K export. The 1080p to 4K step makes the most sense when at least one of these applies:
- Large-screen playback: Client demos, trade-show loops, or living-room TVs where 1080p looks soft at close range.
- Platform or delivery requirements: Some broadcasters, stock agencies, or internal brand guidelines mandate 3840 × 2160 masters.
- Reframing headroom: You plan to crop into the frame in post — starting from an AI-enhanced 4K file preserves more usable area.
- Archival remastering: You are future-proofing a library of clean 1080p camera originals while the source quality still supports enhancement.
If the final output stays on mobile feeds or 1080p projectors, upscaling adds file size and processing time without a visible benefit. Know your delivery target before you commit GPU hours.
FAQ About 1080p to 4K Upscaling
Can I convert 1080p to 4K without losing quality?
You will not gain detail that the camera never captured, but you can avoid making things worse. Work from the least-compressed source file you have, upscale once with AI rather than chaining multiple resizes, and export at a healthy bitrate. That keeps generation loss to a minimum and often produces a noticeably cleaner result than a straight timeline stretch.
What is the best AI upscaler for 1080p to 4K?
It depends on your workflow. For local processing, batch jobs, and fine control over models and export settings, desktop tools lead the field — AVCLabs Video Enhancer AI is one option worth trying, with preview and support up to 4K UHD and beyond. For a quick browser test on a short clip, the online 4K upscaler is enough to get a rough sense of results before you commit to a full render.
Is 1080p to 4K upscaling worth it?
Yes, when large screens, platform specs, or post crop headroom justify the extra pixels. Skip it when the final output stays at 1080p or on mobile — you mostly add file size and render time without a visible gain.
How long does AI upscaling take?
A 10-minute clip may take 15–60 minutes depending on GPU, model, and effects. Desktop tools with NVIDIA or Apple Silicon acceleration are significantly faster.
Should I upscale to 8K instead?
Only if your delivery target requires it. Read our 4K to 8K upscaling guide and online 4K video enhancer before committing to larger files.
Conclusion
A plain 1080p to 4K resize changes the frame size, not the picture quality. AI upscaling is what makes the jump visually credible — it predicts edges and texture a standard converter cannot reconstruct. That distinction drives every choice above: desktop AI for serious delivery, online tools for quick tests, NLE scaling when speed or timeline integration matters more than detail recovery.
The quality ceiling is set before you render. Start from the least-compressed source, deinterlace legacy footage, match the AI model to your content, and upscale once rather than chaining multiple resizes. Export at a bitrate that protects the extra detail through delivery — a sharp 4K file compressed too aggressively still looks soft on arrival.
When your project calls for large-screen playback, platform compliance, or crop headroom in post, a well-executed AI pass on clean Full HD footage can produce a 4K master that holds up on scrutiny. Preview before batch exports, know your delivery target, and skip the step when viewers will never see the extra pixels.